One thing that has been working really well for me over the past 2 years or so is freezer cooking. It all started when my sisters-in-law and my husband's cousin gifted me some frozen meals after my daughter was born. How wonderful it was to have meals prepped and ready to cook in the freezer! Who knew this would be the beginning of a way of life for me.
Since then, I've experimented with my freezer quite a bit. I've gone through the stage of shoving food in various stages of preparation in my freezer, only to forget about it or have no convenient use for it. This includes garden produce, meat, you name it, I've haphazardly tried to freeze it for "later." The only thing is, if later never comes, you've wasted your time and the food you lost in the freezer!
Motherhood has made me much more efficient in so many ways. Two of them have been utilizing my freezer space and getting a good meal on the table, quickly. I now try to have a plan in mind with everything I freeze. If I freeze garden produce, it is typically for a particular use. For example, one year I froze bags of pepper strips for the heck of it, and there they were a year later, crusty with ice and unused. Now last year, I stocked up at the farmers market and froze bags of diced red and green peppers I knew I would use as a pizza topping for our frequent homemade pizza nights, in chili and in my favorite beef barley soup recipe. And I have done just that. It makes all the difference in the world when you freeze food for a purpose. Even better, I have not bought an expensive winter pepper all year.
These days, one of my strategies has been freezing food in ready-to-go packages, to minimize day-of food preparation. Recently, I experimented with freezing cooked, unpeeled, diced potatoes using this method to use as a side dish with other freezer meals I've prepared, like marinated meat. Throw the thawed meat on the grill, the frozen potatoes in a skillet with some onions, and butter/oil, make a salad or other vegetable and you have a delicious, nutritious meal without much fuss.
Freezer cooking has become my favorite way to cook in this season of my life. Over the weekend, I took some of my frozen potatoes a step further and made several packages for the freezer of diced cooked potatoes, cooked broccoli and cooked breakfast sausage, to be used for an easy week-night dinner or brunch of egg casserole - just add eggs and milk, pour into a casserole dish and pop it in the oven. I was making this dish for us to have for brunch on Sunday anyway, so instead of making 1, why not make 4?
As you can see, I'm a big fan of doing messy or laborious preparation once and enjoying it many times over the following couple months. The funny thing is, I love to cook! Just not every meal, every day.
My plan for this coming weekend is a bunch of ground beef main dishes or parts of meals. Maybe it's my pregnancy talking, but the chicken in the freezer isn't doing it for me right now and beef sounds great! Who knows what will sound good next week. Either way, I like to have a variety of choices available to me in the freezer, and I find it most efficient to choose one main ingredient - in this case, ground beef - and make lots of variations on that. After a few cooking escapades like this, before you know it, you've got a selection of meals with beef, pork, chicken, beans, vegetarian or whatever other main ingredients you like to eat.
Here's what I'm thinking for this weekend. Ground round at our high-end grocery store is on sale, and I like to start with good ingredients; cheaper is not always better. You usually get what you pay for. Normally I would go for ground sirloin because it is leaner, but since I'll be making a combination of uncooked burger-type meals as well as cooked ground beef meals, ground round should work just fine.
:: (4 lbs) uncooked hamburger patties - 4 packages of 1 pound each.
:: (6 lbs) uncooked oven hamburgers (ground beef mixed with BBQ sauce, to be baked in the oven) - 4 packages of 1.5 pound each.
:: (6 lbs) cooked meatballs (to add to spaghetti sauce) - 8 packages of 3/4 pound per package
:: (3 lbs) cooked ground beef (to add to spaghetti sauce) - 6 packages of 0.5 pound each
:: (4 lbs) cooked taco meat (using the homemade taco seasoning recipe from Make-A-Mix) - 4 packages of 1 pound each
:: (9 lbs) cooked sloppy joe filling (fabulous recipe from Don't Panic Dinner's in the Freezer) - 6 packages of 1.5 pound each
So that works out to be 32 lbs of ground beef. Watch out, here comes the crazy lady buying 32 lbs of meat. The quizzical looks from behind the meat counter will be worth it. It will be WONDERFUL to have these meals in the freezer, ready to go. Added bonus: my "starting to become picky" toddler likes all of these foods!
Showing posts with label culinary adventure. Show all posts
Showing posts with label culinary adventure. Show all posts
Wednesday, June 9, 2010

Wednesday, March 17, 2010
Winter Comfort Food: Tomato Soup and Simple Mac and Cheese

Lately I have really been enjoying the recipes I have tried from Heavenly Homemakers. I recently came across this recipe for tomato soup that is made from fresh tomatoes and can actually be canned. I love tomato soup and I do love canning, so I was immediately intrigued.
You see, I grew up on Campbell's tomato soup. Despite the fact that the second ingredient is high fructose corn syrup, I still buy it and still like it once in awhile. It's a childhood thing.
Now in the summertime, we use just about every tomato we can get for our favorite spaghetti sauce canning recipe. But, I'm always open to squeezing in a new recipe if it's really great and if it's something we will love in the middle of the winter. If it can be an actual meal for us? Even better. I mean, I do like jam and jelly, but seriously, how much can you eat of that stuff?
So I happened across this tomato soup recipe. Four simple ingredients: tomatoes, onion, butter and salt. Three hours on the stove. A splash of cream. Heaven in a bowl.
I was just going to bookmark the recipe and add it to my list this summer, but then I had an idea. My father-in-law gave us a bunch of quarts of tomatoes he canned last summer, and I still had some left. I decided to use those to try out the tomato soup recipe so I could see how it tasted before I allocate our precious summer tomatoes to a recipe I've never tried.
I ran 6 quarts of tomatoes through the food mill to remove the seeds and doubled the tomato soup recipe. If a recipe is going to have to cook for three hours, I'm going to make a BIG batch. When it was finished simmering, I used my immersion blender to puree it in the pot. And then I tasted it... wonderful. It had just the flavor I was looking for: simple and tomatoey. And, it goes well with this delicious recipe for easy, creamy macaroni and cheese.
We ended up eating some that day (Molly gobbled it up), putting about 2 quarts in the fridge, and I froze another 3 quarts. This recipe will be definitely be on the priority list this summer. We'll see how much canning I get done with baby #2 due 9/15....!
Monday, March 15, 2010
My Own Giftable Arrangement
Ever heard of that company that makes beautiful bouquets out of fresh fruit? Well, I have, and they're one of my favorite gifts to give and receive. They don't wilt like flowers (though don't get me wrong, I still love flowers!), and yet they are a treat that doesn't happen to add inches to your waistline like cookies, cake or candy.
Over the weekend, I had planned to pick up one of these bouquets to give to a friend's daughter who just had knee surgery. Then, it occurred to me... maybe I could make it myself. I mean, really, how hard could it be to skewer some fruit and turn it into a masterpiece?
Well, here it is, so you tell me.

The recipient's family really likes pineapple, so I decided to start with that for an edible, yet attractive base. Then I washed up some strawberries, grapes, raspberries and blackberries. I also peeled and sliced the rest of the pineapple and used a cookie cutter to make heart shapes (yes, that's what those shapes are). Then I went to work with the skewers until it seemed like there was enough fruit.
In the end, I spent a fraction of the price I would have paid for the professional version, yet was able to use more exciting fruit like raspberries and blackberries, and we got to eat the leftover fruit! Which was good, since, while I was making the bouquet, I had to constantly fend off Molly, who must have eaten her weight in fruit yesterday. I guess there are worse foods to overindulge on.
Over the weekend, I had planned to pick up one of these bouquets to give to a friend's daughter who just had knee surgery. Then, it occurred to me... maybe I could make it myself. I mean, really, how hard could it be to skewer some fruit and turn it into a masterpiece?
Well, here it is, so you tell me.

Definitely not bad for a first attempt. A little chaotic looking, but definitely fun, unique and delicious.
The recipient's family really likes pineapple, so I decided to start with that for an edible, yet attractive base. Then I washed up some strawberries, grapes, raspberries and blackberries. I also peeled and sliced the rest of the pineapple and used a cookie cutter to make heart shapes (yes, that's what those shapes are). Then I went to work with the skewers until it seemed like there was enough fruit.
In the end, I spent a fraction of the price I would have paid for the professional version, yet was able to use more exciting fruit like raspberries and blackberries, and we got to eat the leftover fruit! Which was good, since, while I was making the bouquet, I had to constantly fend off Molly, who must have eaten her weight in fruit yesterday. I guess there are worse foods to overindulge on.
Tuesday, March 9, 2010
Maple Syrup: As Local as it Gets
As you may have noticed, I like to experiment with all things food. I also feel such a sense of pride when I can duplicate or recreate or improve upon foods I like that are already readily available. My husband and I are also big fans of domestic adventures, focusing on botanical and other... experimentation, shall we say. Since we've known each other for the last almost 7 years, we've dabbled in organic gardening, canning, freezing, beer-making, wine-making, vineyard and orchard growing, beekeeping, cheese-making and I'm sure other projects I'm forgetting.
Well, add maple syrup making to our list.
I actually don't know why it took us 7 years to come up with this idea, but this year we decided to learn how to tap the maple trees in our yard. The quick description of maple syrup "making" is this: you tap your trees, collect the sap, and boil it down until most of the water is gone, and you are left with sweet, gooey maple syrup. It takes 40 gallons of sap to produce 1 gallon of maple syrup. So far, after 2 days of collecting sap from one tap, we have... drumroll please.... 1 oz of syrup! Here it is!


I covered the whole contraption with foil to keep the sap as clean as possible.

Then you let it sit and the sap drips into your bucket. After 2 days, here's what we collected:

We couldn't believe it! You don't want to have the sap sit outside too long, as I'm guessing the sugars may start to ferment, so today I brought in the weekend's sap and started boiling. I poured it into a 4 cup measuring cup, and it was basically overflowing. I guesstimated it to be around 5 cups, or 40 oz sap. I poured it through some cheesecloth and then boiled it down for an hour or two until it got darker in color, thickened up slightly, and since there wasn't much there, I stopped boiling before it burned to the bottom of the pan.


Well, add maple syrup making to our list.
I actually don't know why it took us 7 years to come up with this idea, but this year we decided to learn how to tap the maple trees in our yard. The quick description of maple syrup "making" is this: you tap your trees, collect the sap, and boil it down until most of the water is gone, and you are left with sweet, gooey maple syrup. It takes 40 gallons of sap to produce 1 gallon of maple syrup. So far, after 2 days of collecting sap from one tap, we have... drumroll please.... 1 oz of syrup! Here it is!

I know, I know, less than impressive. I'm pretty excited though. This shows me that it is possible. I share more details on the maple syrup process below.
First, you find the south-facing side of your tree and drill a 1/2" hole 2 inches deep (eek, I felt like I was killing our lovely maple tree, but I know this is done all the time for maple syrup making, and their trees don't die!). I only did one tree the first day just to make sure it worked before drilling another tree. Once your hole is drilled, you push in the spile - that's the little spout that guides the sap out of your drilled hole into your collection bucket. The spile has a hook on it so you can hang your bucket.

I covered the whole contraption with foil to keep the sap as clean as possible.

Then you let it sit and the sap drips into your bucket. After 2 days, here's what we collected:

We couldn't believe it! You don't want to have the sap sit outside too long, as I'm guessing the sugars may start to ferment, so today I brought in the weekend's sap and started boiling. I poured it into a 4 cup measuring cup, and it was basically overflowing. I guesstimated it to be around 5 cups, or 40 oz sap. I poured it through some cheesecloth and then boiled it down for an hour or two until it got darker in color, thickened up slightly, and since there wasn't much there, I stopped boiling before it burned to the bottom of the pan.

And once again, here is my finished product, all 1 oz of it!
I tasted it a couple times, and it is definitely sweet and kind of mapley. Here's the thing: I knew we had at least one sugar maple, but I wasn't sure if I picked the sugar maple or the "other" maple tree to tap! Sugar maples have brilliant red fall color, and our other maples have yellow leaves in the fall. Since there are currently no leaves on any of the trees and I couldn't remember which was which, I just picked one. I don't think I picked the sugar maple.
A couple things to consider when trying to make maple syrup:
:: Sugar maples produce sap with the highest sugar content, but other types of maple trees produce sweet sap also that can be made into syrup. You just might have to boil it down longer to get more water out.
:: The time of year that you can collect this sap is in the spring when outdoor temperatures are below freezing overnight and above 40 degrees in the daytime.
So today, I tapped the other tree that I suspect to be the sugar maple. I used the other two spiles we bought, and put them both in the same tree since it is a bigger tree and apparently you can tap a few places on one tree.

I'll have to let you know how it all turns out! I'm hoping for another couple ounces at least, and then next year... we'll get started a little earlier.
Thursday, February 25, 2010
Something From Nothing: Homemade Stuffing
One of my favorite cooking escapades is to make something from nothing. That nothing is referring to a little of this and a little of that from the refrigerator, pantry or freezer which could easily be thrown out. Sometimes when you have the right amounts of nothing, you can make something quite delicious!
Today I am trying my hand at making my own stuffing from various bits of bread that I have been stashing away in the freezer. I've been making homemade bread for many months now, and sometimes I'm ready for a fresh new loaf before we finish the last one. Instead of throwing the old bread out, I've been cutting it into cubes or tearing it into little pieces and putting it in a bag in the freezer. My plan had been to make stuffing or croutons. Stuffing it was.
I somewhat followed a recipe from the book "Make-A-Mix" by Karine Eliason, Nevada Harward and Madeline Westover. Basically you make a dry stuffing mix which you can store in your pantry like any other stuffing mix, and then add wet ingredients and bake when you're ready to eat it. I'm very interested in getting as many processed foods out of our house as possible, and I do love stuffing, so I figured it would be worth trying this recipe.
You're supposed to start out with 30 slices of firm-textured bread, cut into 1/2 inch cubes. I just guessed and used what I had, which ended up being approximately the right amount. All of my bread was also frozen to start out with.

Bake in a 300 degree oven for about 45 minutes, or until the bread gets a little toasty and dries out. Stir occasionally as it is cooking.

Combine:
1/2 cup canola oil (reduced from 2/3 cup in original recipe)
3 tablespoons instant minced onion
3 tablespoons dried parsley flakes
2 teaspoons garlic salt
3/4 teaspoon ground sage
1/2 teaspoon pepper
When the bread is done, put it in a bowl and add the seasonings. Toss lightly until the oil mixture coats the bread cubes as well as possible. Then you can put the stuffing mixture in an airtight container and store in a cool, dry place for 3-4 months. I just divided mine into two containers: one for tonight's dinner, the other for another time.

To make the stuffing:
1 cup chicken broth
1/2 stick butter, melted (yikes! This is reduced from 6 tablespoons in the original recipe)
1 onion, finely chopped
4 large sticks celery, finely chopped (I used carrots instead because that's what I had)
6-7 cups of the bread/seasoning mix
Melt butter in a skillet and saute onion and celery/carrots until crisp-tender. In a large bowl, combine the bread mix with the vegetables and chicken broth. Toss lightly and put mixture in a lightly buttered casserole dish. The recipe didn't say to cover the dish, but I did. Bake 30 minutes at 350 degrees.
We went for total comfort food last night with rotisserie chicken, stuffing and mashed potatoes. Yum, it was delish. My husband couldn't believe it was homemade. This recipe is a keeper!
Today I am trying my hand at making my own stuffing from various bits of bread that I have been stashing away in the freezer. I've been making homemade bread for many months now, and sometimes I'm ready for a fresh new loaf before we finish the last one. Instead of throwing the old bread out, I've been cutting it into cubes or tearing it into little pieces and putting it in a bag in the freezer. My plan had been to make stuffing or croutons. Stuffing it was.
I somewhat followed a recipe from the book "Make-A-Mix" by Karine Eliason, Nevada Harward and Madeline Westover. Basically you make a dry stuffing mix which you can store in your pantry like any other stuffing mix, and then add wet ingredients and bake when you're ready to eat it. I'm very interested in getting as many processed foods out of our house as possible, and I do love stuffing, so I figured it would be worth trying this recipe.
You're supposed to start out with 30 slices of firm-textured bread, cut into 1/2 inch cubes. I just guessed and used what I had, which ended up being approximately the right amount. All of my bread was also frozen to start out with.

Bake in a 300 degree oven for about 45 minutes, or until the bread gets a little toasty and dries out. Stir occasionally as it is cooking.

Combine:
1/2 cup canola oil (reduced from 2/3 cup in original recipe)
3 tablespoons instant minced onion
3 tablespoons dried parsley flakes
2 teaspoons garlic salt
3/4 teaspoon ground sage
1/2 teaspoon pepper
When the bread is done, put it in a bowl and add the seasonings. Toss lightly until the oil mixture coats the bread cubes as well as possible. Then you can put the stuffing mixture in an airtight container and store in a cool, dry place for 3-4 months. I just divided mine into two containers: one for tonight's dinner, the other for another time.

To make the stuffing:
1 cup chicken broth
1/2 stick butter, melted (yikes! This is reduced from 6 tablespoons in the original recipe)
1 onion, finely chopped
4 large sticks celery, finely chopped (I used carrots instead because that's what I had)
6-7 cups of the bread/seasoning mix
Melt butter in a skillet and saute onion and celery/carrots until crisp-tender. In a large bowl, combine the bread mix with the vegetables and chicken broth. Toss lightly and put mixture in a lightly buttered casserole dish. The recipe didn't say to cover the dish, but I did. Bake 30 minutes at 350 degrees.
We went for total comfort food last night with rotisserie chicken, stuffing and mashed potatoes. Yum, it was delish. My husband couldn't believe it was homemade. This recipe is a keeper!
Saturday, January 23, 2010
Bagels!
Lately I have been really inspired to make bagels. Maybe it's the Eat From the Pantry Challenge that is making me think twice about every food purchase, or maybe I was just ready for the next culinary adventure. Who knows. I've made three different batches of bagels in the last couple days.
First, I used my current favorite bread recipe's dough to make bagels. I had already made a loaf of bread and was going to make two, but changed my plan after I had already started the second batch of dough, so I thought I would see if the dough would make good bagels. I followed this recipe, which was actually my inspiration for making bagels to begin with, for turning the dough into bagels. Here are some pictures from that attempt:
Batch #1: Boiling the broiled dough.

The finished product. They were 2/3 whole wheat flour (freshly ground hard red wheat), 1/3 unbleached white flour. I made some with cinnamon sugar, some with sesame seeds and minced onion, the rest plain. They were pretty good, but a little bread-like, not so crispy outside/chewy inside like I was looking for. Not surprising, since afterall, I did use bread dough to make them!

Batch #2: Here is the finished product for the original recipe I had been wanting to try. They're 100% whole wheat, and that's how they tasted. A bit too wheaty for me. It could be that I used the hard red wheat instead of the hard white wheat I normally use. I had heard that the red wheat had a stronger flavor but had not used it much. I can't tell much difference in my bread, and these bagels were beautiful ... but wheaty. I'll let Molly eat those!

After I made the first two batches and saw that bagels were not as much work or as time consuming as I assumed, I decided to try to find a good recipe for New York-style bagels. Have I mentioned that I am a total bagel snob? I grew up in New Jersey, and have lived in the Midwest for the past 15 years, where bagels are just not the same. I still dream about New Jersey bagels and pizza.
So I decided to just forget about whole wheat for now, and work on finding a good bagel recipe that might get me close to my ideal bagel: crispy on the outside and chewy goodness on the inside. One-inch layer of cream cheese or egg salad... even better.
Batch #3: I found this recipe for New York-style bagels and tried it tonight. The bagels were pretty good! I would definitely make them again. Maybe I will even play with adding in some whole wheat flour. The recipe made 8 bagels, and they were huge, so I will probably try to turn it into 12 bagels next time. I substituted molasses for the malt syrup, since I didn't have any, though I may just have to get some for this recipe. As with all of the bagel recipes I tried, I used my bread machine for the dough.
Here is a picture of the finished product:

First, I used my current favorite bread recipe's dough to make bagels. I had already made a loaf of bread and was going to make two, but changed my plan after I had already started the second batch of dough, so I thought I would see if the dough would make good bagels. I followed this recipe, which was actually my inspiration for making bagels to begin with, for turning the dough into bagels. Here are some pictures from that attempt:
Batch #1: Boiling the broiled dough.


Batch #2: Here is the finished product for the original recipe I had been wanting to try. They're 100% whole wheat, and that's how they tasted. A bit too wheaty for me. It could be that I used the hard red wheat instead of the hard white wheat I normally use. I had heard that the red wheat had a stronger flavor but had not used it much. I can't tell much difference in my bread, and these bagels were beautiful ... but wheaty. I'll let Molly eat those!

After I made the first two batches and saw that bagels were not as much work or as time consuming as I assumed, I decided to try to find a good recipe for New York-style bagels. Have I mentioned that I am a total bagel snob? I grew up in New Jersey, and have lived in the Midwest for the past 15 years, where bagels are just not the same. I still dream about New Jersey bagels and pizza.
So I decided to just forget about whole wheat for now, and work on finding a good bagel recipe that might get me close to my ideal bagel: crispy on the outside and chewy goodness on the inside. One-inch layer of cream cheese or egg salad... even better.
Batch #3: I found this recipe for New York-style bagels and tried it tonight. The bagels were pretty good! I would definitely make them again. Maybe I will even play with adding in some whole wheat flour. The recipe made 8 bagels, and they were huge, so I will probably try to turn it into 12 bagels next time. I substituted molasses for the malt syrup, since I didn't have any, though I may just have to get some for this recipe. As with all of the bagel recipes I tried, I used my bread machine for the dough.
Here is a picture of the finished product:

Wow, I can't believe I made bagels! Have you had any culinary adventures lately?
Sunday, January 3, 2010
Winter Trash Can Turkey
When turkeys were $0.40 a pound at Thanksgiving time, I bought two extras for the freezer. A turkey is nice to have on hand to roast over the weekend, and then enjoy leftovers in turkey and dumplings, turkey and noodles, turkey pot pie... the possibilities are endless.
This year, I wish I would have bought many more turkeys for the freezer. See this post for why I only had room for two.
We decided to try out a recipe that we did a couple times this summer - but on a 15 degree day instead of a lovely summer day. We made a trash can turkey! It was DELICIOUS. Seriously. You have to try it. The flavor is wonderful, the meat is incredibly juicy, and there is even a hint of smokiness to the meat, which I love. Not to mention that my 15 lb turkey cooked in less than 2 hours and there was no roasting pan to clean up!
Here are a few pictures of our culinary adventure today. First I laid out some heavy duty foil and poured an 18 lb bag of briquettes onto it. You light it the same way you would for grilling, and let them cook until they are gray. While that was cooking, we pounded a 2X2 stake into the ground and covered it with foil. I laid out other sheets of foil around the stake, to protect the turkey in case it happens to fall down the stake onto the ground (which has not happened to us yet).

In the house, I rubbed the turkey with canola oil, salt, pepper and smoked paprika. Then, I hung the turkey on the stake.
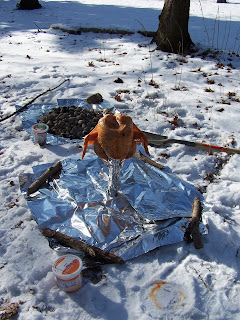


One hour and 45 minutes later, we used the shovel to take the hot coals off the top of the can, and scraped away the coals at the base. Then, we lifted the trash can and... viola! A toasty, perfectly cooked turkey. The heat from our experiment must have warmed the frozen ground, so the stake started to lean, but this didn't hurt anything.


This year, I wish I would have bought many more turkeys for the freezer. See this post for why I only had room for two.
We decided to try out a recipe that we did a couple times this summer - but on a 15 degree day instead of a lovely summer day. We made a trash can turkey! It was DELICIOUS. Seriously. You have to try it. The flavor is wonderful, the meat is incredibly juicy, and there is even a hint of smokiness to the meat, which I love. Not to mention that my 15 lb turkey cooked in less than 2 hours and there was no roasting pan to clean up!
Here are a few pictures of our culinary adventure today. First I laid out some heavy duty foil and poured an 18 lb bag of briquettes onto it. You light it the same way you would for grilling, and let them cook until they are gray. While that was cooking, we pounded a 2X2 stake into the ground and covered it with foil. I laid out other sheets of foil around the stake, to protect the turkey in case it happens to fall down the stake onto the ground (which has not happened to us yet).

In the house, I rubbed the turkey with canola oil, salt, pepper and smoked paprika. Then, I hung the turkey on the stake.

Then, we put the galvanized trash can (which has never been used for garbage) on top of the turkey. The turkey is not touching the inside of the can.

Once the coals were ready, using a shovel, we put 1/2 of the coals on top of the can and 1/2 around the base.

Then, since we had never done this in the cold weather before, we put the trash can lid on top of the coals and folded up the foil around the base, so that any wind wouldn't burn up our coals too quickly.


Then, with oven mits on and foil against the bird, I took the turkey off the stake and plopped it in a pan. Here it is on our picnic table! We did go inside to eat it, of course. It was SO wonderful and amazingly juicy. Try it sometime! And don't forget to throw the carcass into your crock pot for some fabulous turkey stock. Mine is simmering right now...

Subscribe to:
Posts (Atom)


